Friday, November 22, 2013

Java: Setting MySQL environment for JDBC

Current post is on how to set and test the the MySQL Environment for Java Database Connectivity (JDBC) on Windows for first time with example

Following post is split into six sections:
  1. Overview of JDBC
  2. Steps to install MySQL
  3. Steps to install Connector/J
  4. Sequence to start MySQL
  5. Create MySQL User, Database & Table via mysql prompt
  6. Sample Code to test the connectivity


1. Overview of JDBC:


JDBC (Java Database Connectivity) is a standard Java API for database-independent connectivity between the Java and a wide range of databases.

The JDBC library includes APIs for database usage:
  • Making a connection to a database
  • Creating SQL or MySQL statements
  • Executing SQL or MySQL queries on the database
  • Viewing & Modifying the result records

JDBC is a specification that provides a complete set of interfaces to allow portable access to an underlying database. 

Java can be used to write different types of executable's, such as:
  • Java Applications
  • Java Applets
  • Java Servlets
  • Java ServerPages (JSPs)
  • Enterprise JavaBeans (EJBs)


2. MySQL Setup:


MySQL (My Structured Query Language) is widely used open-source relational database management system (RDBMS).

The default port of Mysql is 3306.

One can download MySQL from its official site here.

If you are on windows operating system, it is recommended to download complete installation

On windows operating system, you also need to add to PATH environment variable the complete MySQL installation path


3. Connector/J Setup:


Connector/J is official JDBC driver for MySQL.

It is used in code to redirect the SQL calls to MySQL database.

One can download Connector/J from its official site here.

If you are on windows operating system, it is recommended to unzip in convenient directory location like same as MySQL path.

On windows operating system, you also need to add to CLASSPATH environment variable the complete path.


4. Steps to run MySQL:


Go to MySQL installation path\ bin.

Double click on mysqld.exe - A MySQL daemon process

Start the command prompt and type 'mysql -u root'


5. Create MySQL Database, Table and User:


Create Database:

Create database [IF NOT EXISTS] databasename;

This will be sufficient for initial development. Detailed information on MySQL CREATE DATABASE syntax page

Example:
Create database IF NOT EXISTS MyDB;

This will create a database MyDB if it does not exists already on server

Create Table:

Create table [IF NOT EXISTS] tableename
{
      column1name     column1type;
      column2name     column2type;
}

This will be sufficient for initial development. Detailed information on MySQL CREATE TABLE syntax page

Example:
Create table IF NOT EXISTS students(
id int not null,
firstname varchar (128),
lastname varchar (128),
std int not null
)


This will create a table students with requested columns if it does not exists already on server

Create User with ALL Privilege:

GRANT ALL PRIVILEGES ON DBName.TableName To 'user'@'hostname' IDENTIFIED BY 'password';
GRANT - This is the command used to create users and grant rights to databases, tables, etc.

ALL PRIVILEGES - This tells it the user will have all standard privileges.

Note: This does not include the privilege to use the GRANT command however.

DBName.TableName - This instructions MySQL to apply these rights for the use onto the which database and tables inside it

Note: You can replace it with * for all tables or store routines

TO 'user'@'hostname' - 'user' is the of the user account you are creating.

Note: You must have the single quotes in there.

'hostname' tells MySQL what hosts the user can connect from. For same machine, use localhost

IDENTIFIED BY 'password' - It sets the password for that user.

Detailed information on MySQL GRANT syntax page

Example:

GRANT ALL PRIVILEGES ON MyDB.* To 'joe'@'localhost' IDENTIFIED BY 'mypwd';

Above statement will create a user 'joe' with password 'mypwd' on 'local machine' mysql server and grant all privileges of all the tables in 'MyDB' database.


6. JDBC Testing code:


/*
    Import the required packages
*/

import java.sql.*;

public class MyFirstDBExample
{
   /*
        JDBC driver name and database URL
        It will be different for different databases
    */
   static final String JDBC_DRIVER = "com.mysql.jdbc.Driver"; 
   static final String DB_URL = "jdbc:mysql://localhost/MyDB";

   /* 
        Database credentials of user we just created
    */
   static final String USER = "joe";
   static final String PASS = "mypwd";
  
   public static void main(String[] args)
   {
       Connection conn = null;
       Statement stmt = null;
       try
       {
            /*
                Register the driver
            */
           
            Class.forName(JDBC_DRIVER);
            System.out.println("Registered the driver successfully!!!");

            /*
                Open a connection
            */
           
            System.out.println("Connecting to database...");
            conn = DriverManager.getConnection(DB_URL,USER,PASS);
            System.out.println("Connected to database successfully!!!"); 

            /*
                Create a Statement
            */
           
            System.out.println("Creating statement...");
            stmt = conn.createStatement();
           
            String sql;
            sql = "SELECT id, first, last,std FROM students";
           
            System.out.println("Executing statement...");
            ResultSet rs = stmt.executeQuery(sql);

            /*
                Extract data from ResultSet
            */
           
            System.out.println("Extracting the Data...");
           
            while(rs.next())
            {        
                int id  = rs.getInt("id");
                String first = rs.getString("first");
                String last = rs.getString("last");
                int std = rs.getInt("std");

               
                System.out.print("ID: " + id);               
                System.out.print(", First Name: " + first);
                System.out.println(", Last Name: " + last);
                System.out.print(", Studies in Standard: " + std);
            }
           
            /*
                Close all the descriptors
            */
           
            System.out.println("Closing the Descriptors...");
           
            rs.close();
            stmt.close();
            conn.close();
           
            System.out.println("Example executed successfully");
       }
       catch(SQLException se)
       {
            /*
                Handle errors for JDBC
            */
           
            se.printStackTrace();
       }
       catch(Exception e)
       {
            /*
                Handle errors for Class.forName
            */
            e.printStackTrace();
       }
       finally
       {
          try
          {
             if(stmt!=null)
                stmt.close();
          }
          catch(SQLException se1)
          {
          }
         
          try
          {
             if(conn!=null)
                conn.close();
          }
          catch(SQLException se2)
          {
             se.printStackTrace();
          }
       }
  
        System.out.println("Have a Nice Day!!!");
    }   
}


Hope this post saved your time.

Appreciate your feedback via comments.

Thanks.
Mehul

Tuesday, November 19, 2013

Java: Apply File Filter in AWT FileDialog

Current post is on how to apply File Filter in Abstract Window Toolkit (AWT) FileDialog component on Windows

Started working on AWT in Java and got stuck in FileFilter FileDialog component?

Unable to get the desired filter in FileDialog on Windows?

Just set the required file filter in setFile function of FileDialog
fileDialogObject.setFile(".java");

Because:

In setFileFilter Java documentation it states:
Filename filters do not function in Sun's reference implementation for Microsoft Windows.


FileDialog setFile in Java:


FileDialog fileDialogObject = new FileDialog(parentFrame,"Java Files Selection",FileDialog.LOAD);

fileDialogObject.setFile("*.java");

//It will show all the .java extension files in FileDialog Box


For more details refer to Java documentation on FileDialog

Hope this post saved your time.

Appreciate your feedback via comments.

Thanks.
Mehul

Saturday, August 10, 2013

Java: Checked Exception in detail with examples

Current post is to help one understand checked exceptions with examples. Why it was introduced? How much it is useful?

Checked Exception:


Checked exceptions are those exceptions which are derived from Throwable but not from Error or RuntimeException class & their subclasses.

It means any exception class you derive which is neither from Error nor from RuntimeException class & their subclasses is checked exception class.

You may derive from Throwable Class or Exception Class. It's at user's design discretion.

Checked exceptions must fulfill the Catch-or-Specify rule.


Catch-or-Specify:


Catch-or-Specify rule means that the exception should either be caught via exception handling code or should be specified in method declaration.

Catch - The method should enclose the method which might throw checked exception in try-catch block.

Specify - The method should mention the exception name via 'throws' in its declaration which uses the method which might throw checked exception.


Examples:


Example 1: New Checked Exception class which is derived from Exception Class

Exception Class:

    class MyCheckedException extends Exception
    {
        MyCheckedException()
        {
            super("New Checked Exception");
        }

        MyCheckedException(String msg, Throwable e)
        {
            super(msg,e);
        }
    }

Method that throws MyCheckedException:

    void myMethodThrowsMyCheckedException()
    {
        throw new MyCheckedException();
    }

Usage:

    void somemethod()
    {
        myMethodThrowsMyCheckedException();
    }

For above code you will get similar error depending on IDE:

"...: Must be caught or declared to be thrown"

Do the following to remove compile error:

Method that throws MyCheckedException:

void myMethodThrowsMyCheckedException() throws MyCheckedException
    {
        throw new MyCheckedException();
    }

Usage:

    void somemethod()
    {
        try
        {
            myMethodThrowsMyCheckedException();
        }
        catch(MyCheckedException e)
        {
            //Do the needful :)
        }
    }


Example 2: New Checked Exception class which is derived from Throwable Class

Exception Class:

    class MySecondCheckedException extends Throwable
    {
        MySecondCheckedException()
        {
            super("New Checked Exception from Throwable");
        }

        MySecondCheckedException(String msg, Throwable e)
        {
            super(msg,e);
        }
    }

The method that throws MySecondCheckedException & usage will be similar to above code except for the exception name will be 'MySecondCheckedException'

Why it was introduced?:


As we have seen Checked exception must comply Catch-or-Specify paradigm. And if we fail to catch or specify, compiler shows an error

It is for this reason, checked exception were introduced to have strong exception handling code. It is far better to get error at compile time rather then at runtime on field

How much it is useful?:


It is very useful as one will get an error at compile time if one tries to use your method which might throw checked exception which is neither caught or specified.

Planning to create a helper library with custom exceptions. Checked exception is worth a thought.


Some developers see it as an overhead but for me its a good concept that helps in stable code with good exception handling logic.

Appreciate your feedback via comments.

Thanks,
Mehul

Thursday, July 4, 2013

Quick eFile ITR-1 (SAHAJ) Form Filling 2012-2013 (A.Y. 2013 - 2014)

Current Post is on how to fill 'Quick EFile ITR' on Income Tax Site for ITR-1 (SAHAJ) Income Tax Form for 2012-2013 from Form 16 & Form 12BA (Assessment Year 2013 - 2014)

Post covers the filling of ITR-1 (SAHAJ) form for e-Filing via Quick EFile ITR Option.

If you are planning to fill via excel sheet, here is the post on how to fill the excel sheet for ITR1 Sahaj 2012-2013 (Assessment Year 2013 -2014)

But if you are planning to manual fill the paper form, it will be on similar line.

Friendly advice: Do e-Filing, it is faster, convenient and refunds are quicker.

Assuming you have log-in into Income Tax India e-Filing Site.


Quick eFile ITR:


'Quick eFile ITR' Option is available under 'Quick Link' Section on Left Side of India Income Tax Site.

Quick efile ITR menu option under 'Quick Link'

Fill the following required details:
  • PAN* - Automatically filled and non-editable
  • ITR Form Name* - Select ITR-1
  • Assessment Year* - Select 2013-2014
  • Prefill Address With - Select the option best suited to you
  • Do you want to digitally sign - Select 'No' unless you have digital signature.

Click the 'Submit' button.

A Six Tab page with 'Instructions' Tab open will be seen.

1. Instructions:

  1. * - Required filled. Cann't be empty.

  2. Save the data every few minutes by pressing 'Save As Draft' to avoid losing the entered data on site.

  3. The site itself will pop-up following message if you don't save data very often:

  4. Message to 'Save As Draft'

  5. If you don't want to have pop-up every few minutes, check the option and press 'OK'

  6. Message to 'Save As Draft' With Prevent popup option


2. Personal Information:


'Personal Information' subsection will be seen:

Personal Information Subsection

Fill the following field's:
  • A1. First Name - First Name as per your PAN card
  • A2. Middle Name - Middle Name as per your PAN card
  • A3. Last Name* - Automatically filled and non-editable
  • A4. PAN* - Automatically filled and non-editable
  • A5. Gender* - Select from the drop-down menu option
  • A6. Date of Birth* - Automatically filled and non-editable
  • Status* - Select 'Individual'
  • A7. Income Tax Ward / Circle - Not required. If you know, enter the respective name
  • A8. Flat / Door / Building* - Automatically filled as per main page address selection, editable
  • A9. Road / Street - Automatically filled as per main page address selection, editable
  • A10. Area / Locality* - Automatically filled as per main page address selection, editable
  • A11. Town / City / District* - Automatically filled as per main page address selection, editable
  • A12. State* - Automatically filled as per main page address selection, manually selection available
  • A13. Country* - India
  • A14. Pin Code* - Automatically filled as per main page address selection, editable
  • A15. Email Address* - An active email address, as you don't want to miss any tax related notifications
  • A16. Mobile No 1* - An active mobile number, as you don't want to miss any tax related notifications
  • A17. Mobile No 2 - Not required
  • Landline Number - Not required.

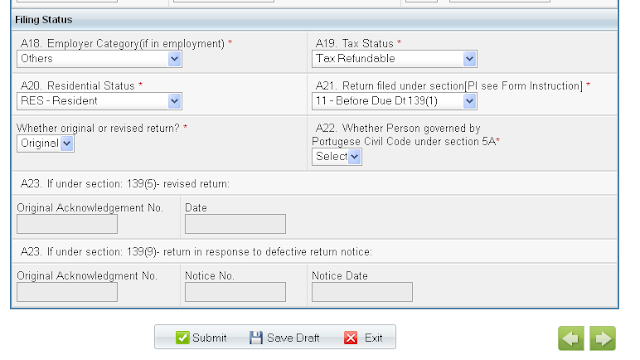
'Filing Status' subsection will be:

Filing Status Sub-Section

Fill the following fields:
  • A18. Employer Category (if in employment)* - Mostly it will be OTH, kindly select as per your category
  • A19. Tax Status* - Select from Drop-down as per your tax valuation
  • A20. Residential Status* - Select from Drop-down respective status
  • A21. Return filed under section* - Select from Drop-down 11 - BeforeDueDt 139(1) (if all your taxes are paid and submitting before 31 July 2013)
  • Whether original or revised return?* - Select from Drop-down respective return.
  • A22. Whether Person governed by Portugese Civil Code under Section 5A* - Mostly 'No'

Mostly, this would be sufficient for this section, unless you are responding to 139(5) - Revised return or 139(9) - Return in response to defective return notice. In such case, fill the required Acknowledgement Number and date.

3. Income details:


'Income And Deduction' subsection will be seen:

Income And Deduction Section

Fill the following field's:
  • B1. Income from Salary / Pension (Ensure to fill Sch TDS1) - Fill the value from Form 16 - INCOME CHARGEABLE UNDER THE HEAD 'SALARIES'
  • B2. Type of House Property - Select the property type if income gained. Mostly none.
  • B2. Income from one House Property - Enter the respective amount if income earned
  • B3. Income from Other Sources (Ensure to fill Sch TDS2) - Fill the total value from other sources    
  • B4. Gross Total Income (B1+B2+B3) - Non-editable, automatically sums up B1, B2 & B3 values
Deductions under chapter VI A (Section)

Following section needs to be filled from Form 16 values:
  • C1. 80C
  • C2. 80CCC
  • C3. 80CCD (Employees / Self Employed Contribution)
  • C4. 80CCD (Employers Contribution)
  • C5. 80D(Maximum eligible amount is Rs. 15000. For Senior Citizen, it is Rs. 20000 )
  • C6. 80DD(Maximum eligible amount is Rs. 50000. For Severe Disability, it is Rs. 100000)
  • C7. 80DDB(Maximum eligible amount is Rs.40000. For Senior Citizen, it is Rs. 60000)
  • C8. 80E
  • C9. 80G
  • C10. 80GG
  • C11. 80GGA
  • C12. 80GGC
  • C13. 80U(Maximum eligible amount Rs 50000. For Severe Disability, it si Rs. 100000)
  • C14. 80CCG
  • C15. 80RRB
  • C16. 80QQB
  • C17. 80TTA
Following fields will be automatically calculated / filled:
  • C18. Deductions (Total C1 to C17)
  • C19. Total Income (B4 - C17) 

'Tax Computation' sub-section will be seen below:

Tax Computation Subsection

Most of the fields will be automatically calculated / filled:
  • D1. Tax Payable on Total Income(C19)
  • D2. Education Cess, including secondary and higher secondary cess
  • D3. Total Tax and Education Cess (Payable)(D1+D2)
  • D4. Relief under Section 89
  • D5. Balance Tax Payable (D3-D4)
  • D6. Interest u/s 234A - Mostly '0', if taxes paid & filed before due date of 31 July 2013
  • D7. Interest u/s 234B - Mostly '0', if taxes paid & filed before due date of 31 July 2013
  • D8. Interest u/s 234C - Mostly '0', if taxes paid & filed before due date of 31 July 2013
  • Total Interest Payable ( D6 + D7 + D8 )
  • D9. Total Tax and Interest Payable (D5+D6+D7+D8)

4. TDS:


'SCH TDS1, SCH TDS2 & SCH IT' subsection will be seen:
 
SCH TDS1, SCH TDS2 & SCH IT subsection

All the sections will be automatically updated / filled by the site.

At-least cross check the following values.
  • TAN of Employer - Value from Form 12BA - TAN
  • Name of the Employer - Value from Form 12BA - Name & Address of the Employer
  • Income charged under Head of the salaries - Value from Form 16 -  INCOME CHARGEABLE UNDER THE HEAD 'SALARIES'
  • Total Tax deducted  - Value from Form 16 -  Tax Payable
If need be, add the required information to respective subsection as per your receipt details.

5. Taxes Paid and Verification:


'Taxes Paid' subsection will be seen:

Taxes Paid Subsection

Cross check all the field which are automatically filled.
  • D10. Advance Tax
  • D11. Self Assessment Tax
  • D12. TDS
  • D13. Total Taxes Paid (D10 +D11 + D12)
  • D14. Tax Payable (D9 - D13) - Mostly the amount will be zero
  • D15. Refund (D13 - D9) - Check the amount
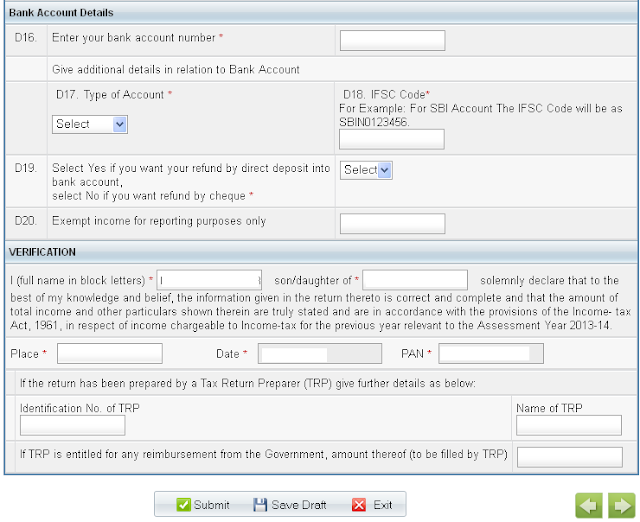
'Bank Account Details & Verification' section will be seen below:

Bank Account Details & Verification subsection

Fill the following fields:
  • D16. Enter your Bank Account Number* - To which Bank Account one needs the cheque \ transfer for refund amount
  • D17. Type of Account* - Select from Drop-down the account type of Bank Account number you mentioned above
  • D18. MICR Code* - MICR Code of Bank
  • D19. Refund Type - Select from Drop-down 'Yes' for direct deposit, it will be faster
  • Name* - As per PAN card
  • son/ daugher of* - As per PAN card
  • Place*
  • Date* - Automatically updated, non-editable
  • PAN Card* - Automatically updated, non-editable

6. 80G:

'Donations without qualifying limit' subsection will be seen:

'Donations with qualifying limit' subsection will be seen:


Fill the following details as per your receipt:
  • Name of donee*
  • Address*
  • City / Town / District*
  • State Code*
  • Pin Code*
  • PAN of donee*
  • Amount of donation*
  • Eligible amount of donation - Automatically calculated, non-editable
This completes the form filling :).

I hope it didn't took more then 15-20 minutes to complete the form.

Press 'Submit' Button to submit your income tax return.

Appreciate your feedback via comments.

Thanks.
Mehul

Tuesday, July 2, 2013

India Income Tax ITR-1 (SAHAJ) Form Filling 2012-2013 (A.Y. 2013 - 2014)

Current Post is on how to fill ITR-1 (SAHAJ) Income Tax Form for 2012-2013 from Form 16 & Form 12BA (A.Y. 2013 - 2014)

Post covers the filling of ITR-1 (SAHAJ) form for e-Filing. But if you are planning to manual fill the paper form, it will be on similar line.

Friendly advice: Do e-Filing, it is faster, convenient and refunds are quicker.

Assuming you have downloaded the form from Income Tax India e-Filing Site.

- Unzip the 'ITR1_2013' zip file and open the '2013_ITR1_PR6.xls' excel sheet.

- Enable Editing & Allow Macro operation if the excel software pop-ups the options.

- Excel sheet will have 4 sheets.
  1. Income Details
  2. TDS
  3. Taxes Paid and Verification
  4. 80G - Not covered in current post
Basic Instructions:
  • Compulsory Fields - Green Background & Red Color Label
  • Optional Fields - Green Background & Black Color Label
  • Auto-calculated Fields - White Background & Blue Color  Label

1. Income Details Sheet:


- Fill the following cells:
  • First Name - As per PAN card
  • Middle Name - As per PAN card
  • Last Name - As per PAN card
  • PAN Number
  • Flat \ Door \ Building
  • Status - I Individual
  • Area \ Locality
  • Date of Birth (DD \ MM \ YYYY) - As per PAN card
  • Town \ City \ District
  • State - Select from Drop-down option, don't write it manually
  • Pincode - In hurry don't write your permanent address or office address pincode
  • Sex - Select from Drop-down option, don't write it manually
  • Email Address - Your working and active email address. As you don't want to miss any tax related emails
  • Mobile Number - Your working and active number. As you don't want to miss any tax related SMS
  • Employer Category - Mostly it will be OTH, kindly fill as per your category
  • Return Filed under section - Select from Drop-down 11 - BeforeDueDt 139(1) (if all your taxes are paid and submitting before 31 July 2013)
  • Whether original or revised return - Select from Drop-down respective return.
  • Residential Status - Select from Drop-down respective status
  • Tax Status - Select from Drop-down as per your tax valuation
  • Income from Salary / Pension - Fill the value from Form 16 - INCOME CHARGEABLE UNDER THE HEAD 'SALARIES' 
  • Income from other sources - Fill the total value from other sources
  • Fill the 'Deductions under ChapterVI A' as per Form 16
  • Tax payable on Total Income - Fill the value from Form 16 - Tax on total Income
  • Education cess... - Fill the value from Form 16 - Education cess... 
  • Relief under Section 89 - Mostly 0
  • Relief under Section 90/ 91- Mostly 0

- Following fields will be automatically calculated / filled:
  • 4 Gross Total Income (1+2+3)
  • 7 Total Income (4-6)
  • 10 Total Tax, Surcharge and Education Cess (Payable) (8 + 9)
  • 13 Balance Tax Payable (10 - 11 - 12)
  • 15 Total Tax and Interest Payable (13 + 14)  

2. TDS Sheet:


- Fill the following cells:

  • Under 23 Tax deducted at source from SALARY
  • TAN of Employer - Fill the value from Form 12BA - TAN
  • Name of the Employer - Fill the value from Form 12BA - Name & Address of the Employer
  • Income charged under Head of the salaries - Fill the value from Form 16 -  INCOME CHARGEABLE UNDER THE HEAD 'SALARIES'
  • Total Tax deducted  - Fill the value from Form 16 -  Tax Payable
  • Under 24 Tax deducted at source of Income other then Salary - Fill as per receipt details

3. Taxes Paid & Verification:


 - Fill the following cells:

  • Enter your Bank Account Number - To which Bank Account one needs the cheque \ transfer for refund amount
  • Refund Type - Select from Drop-down 'Yes' for direct deposit, it will be faster
  • MICR Code - MICR Code of Bank
  • Type of Account - Select from Drop-down the account type of Bank Account number you mentioned above
  • Name - Same as in PAN card
  • son/ daugher of - Same as in PAN card
  • Place
  • Date
  • PAN Card
- Following fields will be automatically calculated / filled:
  • 16a  Advance Tax (from item 25)
  • 16b TDS (Total from item 23 + item 24)a
  • 16c Self Assessment Tax (item 25)
  • 17 Total Taxes Paid (16a + 16b + 16c)
  • 18 Tax Payable - Mostly the amount should be zero, unless one has to pay the tax
  • 19 Refund - Check the amount
And we are done finally :).

I hope it didn't took more then 15-20 minutes to complete the form.

Appreciate your feedback via comments.

Thanks.
Mehul

Wednesday, March 20, 2013

500 millisec (ms) delay in 'ACK' of TCP/IP in Visual Studio (VS) VC++ ???

Current post is on how to overcome 500 millisecond (ms) delay in 'ACK' acknowledge of send command in TCP/IP in Visual Studio (VS) Visual C++ (VC++) Application


Are you getting a constant 500ms delay in Acknowledgement of send command in TCP/IP in Visual Studio (VS) Visual C++ (VC++) Application??

Is your application sending lot of small data packets in large frequency over TCP/IP sockets in Visual Studio (VS) Visual C++ (VC++) Application??

If the answer is YES, copy the following lines of code after the 'bind' function call to improve the performance of the application:

Disable the Nagle Algorithm:

int value = 1;
setsockopt(, IPPROTO_TCP, TCP_NODELAY, (char *)&value, sizeof (value));

Note:-
1. Application should be able to handle short and large number of TCP/IP socket calls
2. Network Traffic will increase as the underlying protocol won't wait for threshold bytes before sending.


Enable the Nagle Algorithm:

int value = 0;
setsockopt(, IPPROTO_TCP, TCP_NODELAY, (char *)&value, sizeof (value));

Complie. Run. Test and enjoy coding.

Appreciate your feedback via comments. Thanks.

Thursday, March 14, 2013

Steps to get Google Reader Data through Takeout

Current post is on how to get your Google Reader Data through Takeout

As you might know by now, Google will be closing the Google Reader by 1 July 2013. To preserve the subscriptions you accumulated over a period of time, Google Reader provides a link to download the data via Takeout

Just follow this simple steps:

Short Cut Method:

1. Log on to your Google Reader Account
2. Copy the following url: http://www.google.com/takeout/#custom:reader
3. Jump to Step 6 of Normal Method.

Normal Method:

1. Log on to your Google Reader Account
2. Go to Home Page
3. Click on Settings Icon and select Reader Settings

Google Reader Settings

4. Click on Import/Export Tab

Google Reader Import Export Tab

5. Click on 'Download your data through Takeout' link

5.1. After few seconds (Depending on your subscription list, followers, etc)

Google Reader Takeout


6. Click on Create Archive button.

6.1. After few seconds (Depending on your subscription list, followers, etc)

Google Reader Takeout Download

7. Click on download and save the zip file to your machine.

Zip file will have following files:
  • followers.json - List of people that follow you
  • following.json - List of people who you follow
  • liked.json - Items you have liked
  • notes.json - Notes you have created
  • shared.json - Items shared by you
  • shared-by-followers.json - Items shared by people you follow
  • starred.json - Items you have starred
  • subscriptions.xml - Subscriptions you have along with your folder hierarchy
Appreciate your feedback via comments.

Thanks.

Steps to get Google Reader Statistics

Current post is on how to get your Google Reader statistics


Need to know your google reader statistics? Not able to find the 'Trends' tab under Google Reader Account?

Just follow this simple steps:
  1. Log on to your Google Reader Account
  2. Go to Home Page
  3. Press keyboard 'g' and then 'Shift+t'
Kabooom!!!!

Your Google Reader Statistics will be seen with following information:
  • Number of Subscriptions
  • Number of items read over past 30 days
  • Number of items clicked over past 30 days
  • Number of items starred over past 30 days
  • Number of items emailed over past 30 days
  • Total number of items read from the day you activated the Google Reader Account
  • Read - Time of the day in graphical format
  • Read - Day of the week in graphical format

Google Reader Statistics


Take the snapshot and paste to any social platform you like!!!

Appreciate your feedback via comments.

Thanks.

Wednesday, March 13, 2013

India Public Provident Fund (PPF) Account Opening in State Bank of India (SBI)

Current Post is on how an individual residing in India open a Public Provident Fund (PPF) Account in State Bank of India (SBI)

Public Provident Fund (PPF) is a tax saving route taken by many individuals recently. Due to low risk and government backing, many consider it as safe bet. The interest rate declared by Government of India are close to inflation values.

Following sections will help you open an India Public Provident Fund (PPF) Account in State Bank of India (SBI):

Sections:


1. Locate an State Bank of India (SBI) branch.
2. Required Documents
3. Public Provident Fund (PPF) Form A and E Filling
4. Public Provident Fund (PPF) Passbook
5. Rules
6. Tips

1. Locate an State Bank of India (SBI) branch:


One can search for nearest SBI branch via SBI Branch Locator service.
(Most of the SBI branches will be undertaking PPF serive, but it is better to call \ visit the branch to confirm the PPF service availability)

Visit the finalized nearest SBI branch will following documents photocopy and originals.

2. Required Documents:

  1. One Recent Passport size photograph
  2. Address Proof: (Any One)
    • Passport
    • Driving License
    • Ration Card
  3. Pan Card

3. Public Provident Fund (PPF) Form A and E Filling:


Form A is for opening of PPF Account.
  1. Paste the photograph on top right corner.
  2. Mention the branch name in field at top left corner.
  3. Mention the PAN card. Mandatory
  4. Fill the details like name and if for minor your details as guardian
  5. Sign at lower right where signature is mentioned
  6. Also sign at lower left where additional signature is mentioned
Form E is for nomination of PPF Account.
  1. Fill the details like name and if for minor your details as guardian
  2. Take signature of two witnesses mostly your parents or relative signature can be taken
  3. Sign at lower right where signature is mentioned
Deposit Challan:
  1. Account Number: PPF Account Number
  2. Name: Name as you mentioned in PPF Form A
  3. Address: Address as per proof in PPF Address proof document
  4. Amount Details: As per cash denominations or cheque number
  5. Amount in words
  6. Signature

4. Public Provident Fund (PPF) Passbook:


Submit the Form A and Form E along with photocopy. The person in charge will verified the information in Form against the original documents and any missing information.

Mostly the account will be opened in 20 minutes but some times they ask to come next day to collect the passbook.

Passbook first page will be printed with all the required details like Account Number, Name, Son\Daughter\Wife\Husband of, Branch Name.

The nomination details of Form E will be present as Nomination Registration Number on Page 1 of Passbook

From Page 3 onwards the transaction details will be printed.

5. Rules:


  • Only an Indian resident can open an PPF account
  • Only one PPF account for an individual
  • Exempted under 80C - Indian Tax Laws
  • Minimum Limit for deposit is Rs 500 /- per year
  • Maximum Limit for deposit is Rs 1,00,000 /- per year
  • Maximum of 12 deposited can be made over year
  • Deposit should be in multiple of Rs. 5/-
  • Interest Rate is declared every year by Government of India
  • Nomiations can be made. Fill PPF Form E.
  • Minimum tenure for PPF Account is 15 years.
  • Extended with block of 5 years

6. Tips:

  • The lowest balance between 5th and last working day of the month is used for calculating the interest. Hence, depositing the amount before 5th will fetch more interest

Done. We opened the PPF Account in SBI branch.

Appreciate your feedback & suggestions via comments.

Thanks.

Tuesday, March 12, 2013

Python: Remove Non-printable characters from string

Current post is on how to remove non-printable characters from string.


Need a function to remove non-printable characters in python.


Remove Non-printable function for ASCII String:


def    remove_ascii_non_printable(str)
      """Removes Non-printable chars from ASCII String"""
      return ''.join([ch for ch in str if ord(ch) > 31 and ord(ch) < 126 or ord(c) = = 9])

Remove Non-printable function for Unicode String:


def    remove_unicode_non_printable(str)
      """Removes Non-printable chars from ASCII String"""
      return ''.join([ch for ch in str if ord(ch) > 31 or ord(c) = = 9])


Appreciate your feedback via comments.

Thanks.
Disclaimer:

The above post and all the posts in the blog are derived from facts, information, logical interpretation and logical conclusion of printed and internet materials available to me, perceived and produced by 99 gm brain of mine, which by no means always be accurate, consistent and complete.

All the posts are for personal quick reference only.

If any suggestion, correction, misinterpretation, misconception commented, which will be moderated and deleted if required, to avoid unforeseen issues.

If any trademark / copywrite issue is present, do send in a mail and appropriate tag (logo, name, website link) will be attached to the same.

Additional disclaimer will be attached wherever required in the post.